To safely replace a battery in an electronic device, ensure you have the correct replacement battery model that matches your device's specifications. Prepare a safe and well-ventilated workspace equipped with personal protective equipment like safety glasses, gloves, and a lab coat. Use a multimeter to check the old battery's voltage and confirm its discharge status before disposing of it responsibly according to local regulations. Carefully handle the battery compartment, checking for any corrosion or damage that could pose electrical hazards. Securely reassemble all components, ensuring tight connections to prevent short circuits. After installation, power on your device to test its functionality and verify that the new battery is charging properly and draining at a steady rate. Monitor the device over 24 hours for any irregularities in battery performance. If issues arise, consider recalibrating the battery meter, updating the software, or seeking professional assistance. Always adhere to the manufacturer's guidelines during and after the replacement process to maintain your device's safety and optimal performance.
Replacing a device’s battery can extend its lifespan and enhance performance, but it’s a task that demands careful attention to safety. This article serves as a comprehensive guide for DIY enthusiasts looking to embark on a battery replacement project. We’ll navigate through the essential steps of understanding your device’s battery compartment and built-in safety features, selecting the right battery type for a seamless replacement, and providing a detailed, step-by-step guide for safe battery removal and installation. Additionally, we’ll cover critical precautions for handling old batteries, outline the necessary tools and equipment, identify potential hazards, and offer a post-replacement checklist to ensure your device operates correctly afterward. With these safety tips and clear instructions in hand, you can confidently replace your battery and maintain your gadget’s efficiency and longevity.
- Understanding Your Device's Battery Compartment and Safety Features
- The Importance of Selecting the Correct Battery Type for DIY Replacement
- Step-by-Step Guide to Safely Remove and Install a New Battery
- Essential Precautions to Take When Handling Old Batteries
- Proper Tools and Equipment Needed for Battery Replacement
- Identifying Potential Hazards and How to Mitigate Them
- Post-Replacement Checklist: Ensuring Your Device Functions Correctly After a New Battery Installation
Understanding Your Device's Battery Compartment and Safety Features

When planning to replace the battery in your electronic device, it’s crucial to familiarize yourself with its battery compartment and any integrated safety features. Manufacturers often design devices with specific safety mechanisms to prevent damage or injury during battery removal and replacement. These can include insulating materials, protective casings, and circuitry that manage electrical current flow. To access the battery compartment, refer to your device’s user manual for precise instructions; this will typically involve unscrewing screws, removing a panel, or sliding a cover aside. Be mindful of any warning labels or stickers that highlight sensitive areas or components. Once inside, you’ll find the battery secured in place with clips or screws. Carefully disengage these fastenings without applying excessive force to avoid causing damage. Post-removal, it’s equally important to handle the old battery safely. Avoid short circuiting the terminals and ensure proper disposal according to local regulations. When installing a new battery, align it correctly, making sure the positive and negative terminals match their designated positions within the compartment. After replacement, reassemble the device, ensuring all components are securely fastened and the device is functioning properly before powering it on. Throughout this process, adherence to safety precautions and following manufacturer guidelines will help prevent mishaps and ensure your device operates safely with its new battery. Remember to use the appropriate tools and wear protective equipment such as insulating gloves and safety glasses to safeguard yourself during the battery replacement process.
The Importance of Selecting the Correct Battery Type for DIY Replacement

When undertaking a DIY battery replacement, selecting the correct battery type is paramount to ensure the device operates as intended and to prevent potential hazards. The wrong battery can lead to underperformance or, worse, damage to electronic devices. For instance, not all devices are compatible with rechargeable batteries; some may require single-use alkaline batteries due to their design and power requirements. On the other hand, devices like smartphones and laptops typically function best with lithium-ion or lithium-polymer batteries, which offer both high energy density and the ability to be recharged hundreds of times. Replacing a battery with an incorrect type can result in insufficient power, reduced device lifespan, or even immediate malfunction. To avoid these issues, consult the device’s user manual or manufacturer specifications before purchasing a replacement battery. Additionally, ensure that the battery matches the original in terms of voltage and capacity to maintain optimal performance and longevity. By adhering to this safety tip and selecting the right battery type for your DIY project, you can enhance the device’s functionality and protect it from damage associated with improper battery usage.
Step-by-Step Guide to Safely Remove and Install a New Battery

When attempting to replace a battery in DIY fashion, safety should be your top priority. The process of removing and installing a new battery involves handling chemicals that can be hazardous, so precaution is key. Begin by powering down your device and disconnecting it from any charging sources to prevent any electrical current from flowing while you work. This step is crucial as it eliminates the risk of electric shock.
Before physically removing the battery, familiarize yourself with your device’s manual to understand its specific construction and the location of the battery pack. Ensure you have the appropriate tools at hand, such as a screwdriver set with the correct size bits for unscrewing the battery compartment. Carefully remove the exterior casing and any protective covers over the battery to avoid accidentally puncturing or damaging the battery cells. As you proceed, take note of how each component is connected and removed so that you can reassemble everything correctly once the new battery is in place. When replacing the battery, align the new one with precision, making sure it is seated properly and securely before screwing down the compartment. Double-check that all connections are tight and that there are no loose wires or components that could potentially cause a short circuit. After installation, perform a test to ensure your device powers on and functions as expected. Always dispose of old batteries responsibly according to local regulations, as they contain harmful chemicals that can be detrimental to the environment if not managed correctly. By following these steps diligently, you can safely replace your battery and maintain the integrity and functionality of your devices.
Essential Precautions to Take When Handling Old Batteries

When embarking on a DIY battery replacement project, handling old batteries safely is paramount. To prevent potential hazards such as fire or chemical burns, start by wearing protective equipment, including gloves and safety glasses. Ensure you have a proper workspace with good ventilation to mitigate the risks of inhaling harmful fumes released during the disassembly process. Old batteries, particularly those containing lead-acid, nickel-cadmium, or lithium, can be toxic and should never be punctured, crushed, or mixed with other household waste. Dispose of them responsibly according to local regulations, which often involve special recycling programs.
To avoid accidental activation or short-circuiting, always disconnect the battery from any electrical circuits before you begin. Keep a multimeter handy to check the voltage; if it’s above zero, the battery is still charged and should be handled with extra care. Never attempt to replace a battery in devices that you are not familiar with or for which manufacturer guidelines are not available. These precautions will help ensure a safe battery replacement experience, allowing you to enjoy your device’s extended life without compromising safety. Remember to keep the new battery within its original packaging until you are ready to install it, and follow the manufacturer’s instructions closely to replace the battery correctly.
Proper Tools and Equipment Needed for Battery Replacement

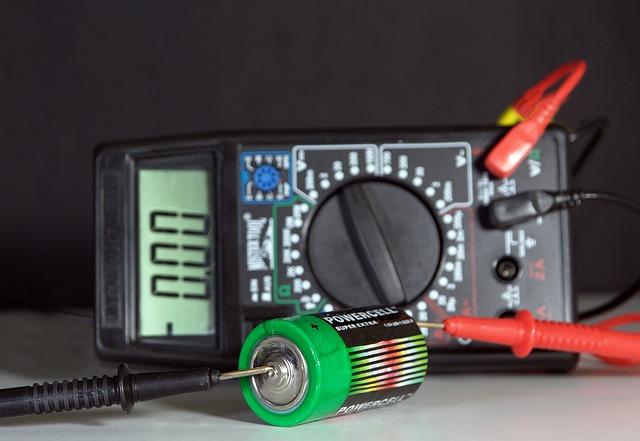
When attempting a DIY battery replacement, it’s crucial to have the correct tools and equipment on hand to ensure the process is performed safely and effectively. A stable work surface, such as a sturdy table covered with a scrap of wood or a battery tray, serves as a foundation to prevent damage to your device or scratching surfaces during disassembly and reassembly. Safety glasses are non-negotiable to protect your eyes from any unexpected sparks, drops, or chemical splashes. A set of precision screwdrivers in various sizes will be essential for removing the battery compartment’s screws without stripping them.
A multimeter is an indispensable tool for checking the voltage and health of both the old and new batteries before and after replacement. It can help avoid the risk of installing a faulty battery, which could lead to device malfunction or pose a safety hazard. Insulated gloves are recommended to handle electronic components, as they can prevent electric shocks when coming into contact with live parts. Additionally, ensure you have the correct replacement battery model for your specific device; using the wrong type of battery can cause irreparable damage. Lastly, keep all removed screws and parts organized in a tray to avoid misplacement, which could delay your repair process or necessitate another trip to the store. With these tools at the ready, you’ll be well-equipped to safely replace your device’s battery, enhancing its performance and longevity.
Identifying Potential Hazards and How to Mitigate Them

When attempting a DIY battery replacement, it’s crucial to recognize and address potential hazards that come with handling batteries and their associated electrical components. Batteries contain chemicals that can be corrosive or cause chemical burns if mishandled. To mitigate these risks, always wear appropriate personal protective equipment (PPE) such as safety glasses, gloves, and a lab coat or protective apron. Ensure you work in a well-ventilated area to prevent the accumulation of harmful fumes. Before starting, carefully inspect the battery compartment for any signs of corrosion or damage that could lead to short circuits or electrical fires. Use a multimeter to check the voltage of the battery before and after removal to avoid the risk of electric shock from a battery holding a charge.
Dispose of old batteries responsibly, as they contain hazardous materials that can harm the environment and pose health risks. Replace the battery with a new one that is compatible with your device, matching the correct voltage and amperage ratings. When reassembling your device, double-check all connections to prevent any future short circuits. It’s also wise to insulate any exposed wires or terminals with electrical tape or heat-shrink tubing to avoid accidental contact that could result in a fire or electric shock. Properly sealing the battery compartment after replacement ensures that no conductive materials come into contact with live electrical components, thus preventing unintended interactions that could compromise safety. Always refer to the manufacturer’s guidelines for specific instructions on battery replacement, as each device may have unique considerations and safety protocols.
Post-Replacement Checklist: Ensuring Your Device Functions Correctly After a New Battery Installation

When replacing a battery in a DIY project, it’s imperative to perform a series of checks to confirm that your device is functioning correctly post-installation. Begin by powering on the device to test its initial response. Ensure that the device turns on as expected and that all features are operational without any anomalies. Check for proper battery charge levels; the device should display a full or near-full charge, indicating that the new battery is holding a sufficient charge. Next, verify that the device’s power management system is functioning by monitoring its behavior throughout the day. The battery level should deplete at a steady rate and charge back up when connected to a power source.
To further ensure your device’s health after the battery replacement, perform a battery recalibration if necessary. This process can help in recalibrating the battery meter so that it accurately reflects the battery’s charge levels. Additionally, note any software updates available for your device, as these can optimize battery performance and address any known issues related to power consumption. Lastly, keep an eye on the battery’s health over time by regularly monitoring its capacity. If you notice significant deviations from normal performance, it may be a sign that further troubleshooting or professional assistance is needed. Always adhere to the manufacturer’s guidelines and safety precautions when handling batteries and electronic devices.
When tackling a DIY battery replacement, adhering to safety guidelines is paramount. This article has outlined the critical steps and considerations necessary to ensure both your device’s functionality and your personal safety. From comprehending your device’s battery compartment and safety features to selecting the appropriate battery type for your specific gadget, each aspect of the process has been addressed. The detailed guide on safely removing and installing a new battery, coupled with the precautions for handling old batteries, equips you with the knowledge to proceed with caution. Remember to equip yourself with the right tools and be vigilant about identifying and mitigating potential hazards throughout the process. With the post-replacement checklist in hand, you can confidently verify that your device is operating as intended after a new battery installation. By following these guidelines, replacing your battery becomes a manageable task, ensuring both your electronic companion’s longevity and your well-being.